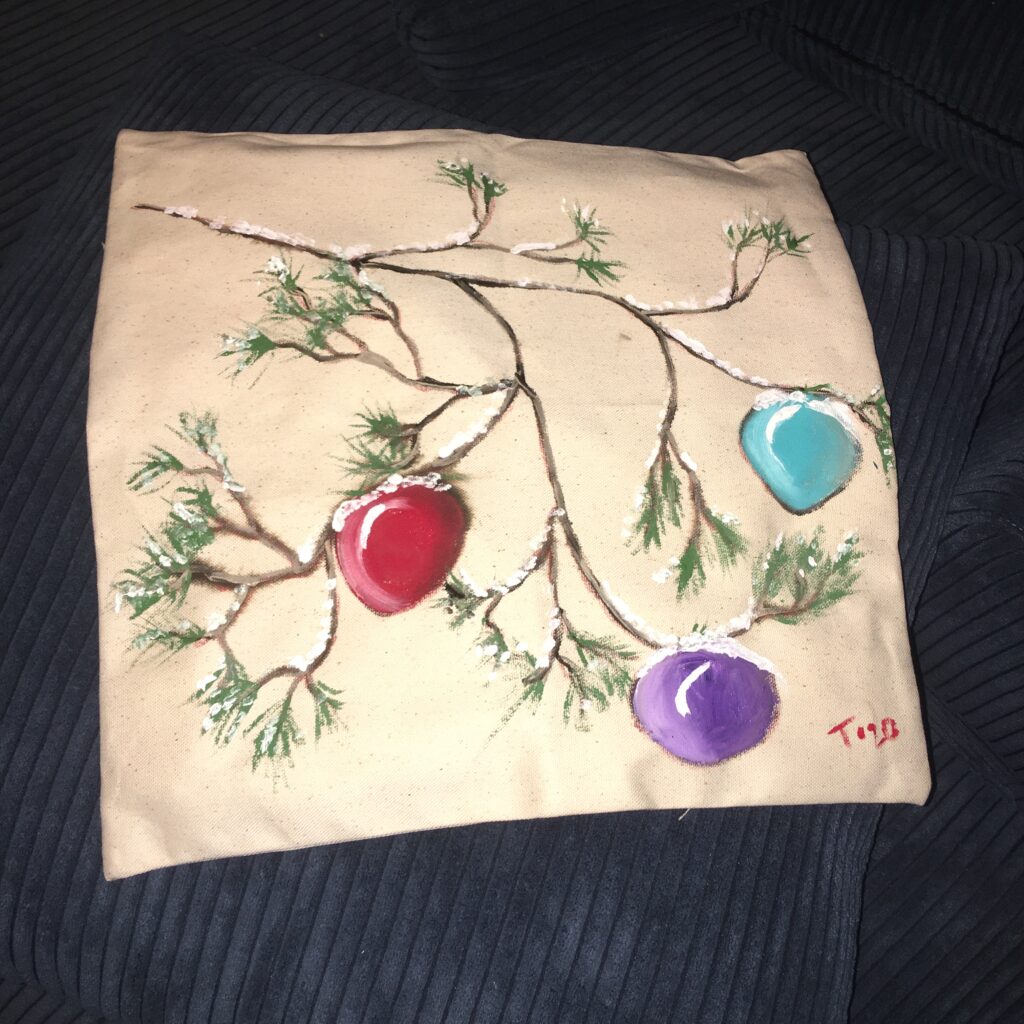
Wow I can’t believe we are so close to Christmas! I decided to do a few holiday inspired projects to get into the holiday spirit and I can’t wait to share all of them with you! The first project I did is this Holiday Decorative Pillow Case. Perfect for a gift or to put in your own house!
Let’s Get Started
Now there are a few things I used to create this pillow case and I will talk about them as I walk you through how I did this project. You will obviously need a pillow case/cover. You can find these just about anywhere and I chose to use one that is canvas. You will want to start by sketching out your design.
If you use a picture for inspiration, then you’ll want to have that close by as a reference. To sketch my design on the pillow case, I used Art Philosophy Oil Pastels in the shade Dark Ochre. I started by first sketching the branches and then sketches out the little bulbs that I wanted. Check out my YouTube video to see the step-by-step.
Filling It In
At this point in the project I knew exactly how I want everything laid out and my sketch is complete so I begin to fill in everything with some color. I used Golden Artists Colors in the shade Van Dyke Brown to fill in my branches. It is watered down by my misting bottle so it can glide over the canvas smoothly. I also misted my canvas pillow case with water because that plus the watered down Golden paint will act a little like watercolor.
I love this paint brand because it is very pigmented and I did not want to have to keep layering on paint. Then, I went in with some red for my first bulb, Golden brand in Teal for my second, and Blick Acrylics in Dioxazine Purple for my final bulb. At first I was just going to paint all the bulbs red, however, I decided to do them different colors.
After I completed my bulbs I went in with some Chromium Oxide Green from Blick Acrylics and added some leaves and foliage to my branches which really helped bring this piece to life!
Finishing Touches
After all by bulbs are painted, now its time to make everything a little more realistic! I went in with my Van Dyke Brown and shaded in some areas and I also used a little bit of white to add in some highlights to the bulbs. Next but was time for the snow! I added this to the tops of the bulbs with white and I stippled it to create a better effect. I used this same technique on the branches and the leaves.
There you have it! This is a quick and easy project that you can complete at home or even with your kids! Here is my YouTube video where you can paint along with me. I would love to see your work once you try this!
Thank you for your support,
Terri Stovall